For the purpose of this online portfolio Jamie's work will feature in a red font meanwhile Jessica's work will feature in blue.
Animation Link: https://www.youtube.com/watch?v=A0HNOKnZrTE&feature=youtu.be
Animation Link: https://www.youtube.com/watch?v=A0HNOKnZrTE&feature=youtu.be
Our final animation submission
Jessica's Page
Consideration of the use of possible formats:
1. Stop Frame:
This is usually called “Stop motion animation”. It is a process/technique which is normally used to make inanimate objects look as though they are moving. The animation is captured a single frame at a time, as the objects are moved in between frames. This is used mainly in Claymation and puppet style animation.
The animated GIF above is a short example of how stop motion works. As you can see the object appears to be moving, this is done with 4 images taken once the object is moved forward slightly.
In 2005, the film Corpse Bride was captured with a DSLR which was the Canon EOS-1D Mark II, It was actually the first stop motion feature film caught with a digital still camera. However early camera’s such as the EOS-1D did not have live view which enables a stream of images through the lens, which is why the studio used a video camera also to provide the feature. However the camera companies Nikon and Canon introduced this feature in 2007.
In order to get the best results while using a DSLR I would make sure to mount it on a tripod as to keep a still image so it will look much more professional and well made. As a personal preference I would use the camera in M mode (manual) and keep auto focus off and auto exposure also.
2. Time Lapse Photography:
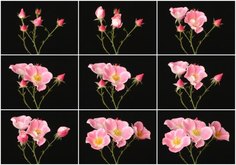
Time-lapse photography is when a camera is allowed to take images of a subject with an interval of time between each image. The interval can be something like a second to a day or longer. When the images are played back the interval of time is increased creating a shorter time. Time lapse photography originated from Eadweard Muybridge, a photographer from the 19th century.
He set out to prove that a horse lifted all four feet off the ground at once. This worked by the horse successively tripping wires attached to 24 cameras which were around 21 inches apart thus capturing the horses movement in each frame. The picture below is an example of how time lapse photography works, as you can see in each scene the flower slowly grows and forms into the last picture in each frame.
3. Claymation:
Claymation is basically clay being animated using stop frame. The process involves using objects or characters created from clay or other mouldable material, and then taking images of each scene that will be replayed in rapid succession to create the illusion of movement. Some well know films are made with this technique such as Wallace and Gromit.
In order to use Claymation in a professional manner the models are often given wire underneath the clay to stop them falling apart. To have the illusion of the characters moving each limb is moved slightly between each frame.
Clay animation is very time consuming therefore productions are usually quite short in length than other animated material due to the work load involved. When Gumby and Pokey came around the form of animation gained great public interest as entertainment. Clay animation was also one of the first forms of 3D animation.
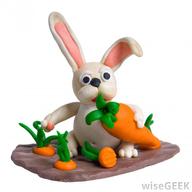
The image below is a rabbit which has been made entirely from clay/Plasticine; this was most likely made using a variety of molding tools and someone who has much more experience in modelling this style of animation.
Generation of concepts
In this section I have looked at possible subjects I could base my animation from and also the subject of my animation
1. Subject
Everyday objects which can be manipulated easily and without making many modifications to the original object. Also the set can be the natural surroundings as they would be there in the first place which keeps with the idea of “everyday objects”
Whiteboard stop motion consists of having access to a whiteboard and pens, a lot of drawing skill may be required when creating these animations in order to keep each drawing similar in look.
Paper cut out animation means drawing your character and simply cutting them out in order to make them stand out
LEGO animation is simply using LEGO people or objects to create your animation, these animations are often called "Brickfilms" they are similar to clay animation, i feel this would be easier than claymation since the models are easy to build however slightly harder to move with the possibility of them falling apart
Sticky notes are quite hard to execute well since they feature a lot of time consuming work, the possibility of sticky notes falling out of place or coming back later to the project and sticking them in the wrong place are major issues to consider and could potentially destroy a good animation. However they are very creative in the way the are produced and can look very pleasing to the eye.
Human animation is done with people they can be quite easy to do if done right, popular examples include things like jumping then snapping a picture, moving forward and jumping again to give the illusion of flying. another popular example are the "human skateboard" videos
I have decided to use clay animation for the final feature. it will include a table as the set with card placed over as the ground, and also card in the background with sets of printed out pages with different background to interchange them as the model changes. The clay model will feature as a ball to start with a plain background, as the model morphs into different subjects the background will change with the model e.g. a fish will change the background to water, a snake will change the background to a forest. the model will become a ball again, then joined by another separate clay ball. the two pieces of clay will join together and form a tree.
2. Characters
When considering what characters to feature in our animation we generated mind maps in order to help create better ideas. I created some concept art for our characters in order to get a better picture to how they look and move. when thinking about what characters to actually model we need to consider the ease to create such as when we use clay and make sure they aren't fragile or too big/small so they don't fall apart or hardly move. I thought about sketching characters since i wouldn't have to worry about moving their limbs and keeping them attached. However sketching requires a lot of time which i don't have to create my animation. I decided to work with clay for my final piece since it shouldn't take very long to create simple models therefore i can save a lot of time with design, rather than having to draw to character over and over again. I have included some simple concept art below to show my thought process for each idea.
3. Technical limitations
When uploading files to Youtube my animation video has to be submitted online as a MP4, however if this were to not be possible for some reason there are a variety of formats to upload to youtube in such as: WMV, AVI, MOV, 3GP, MPEG, MP4, FLV, SWF, WebM, and MKV.
Also MP4 is the ideal format to use when uploading to this site since it gives much better quality than FLV and other formats in HD lose their quality (WMV) and also 3GP resolution can be too small.
Upload time shouldn't be much of a problem since the animation will be 2-3 minutes long, however when i import my sequence of images into Premiere pro i will have to cut down each image's length to at least a second or so to create the illusion of movement, these will have to be done individually.
Mind maps
Mind map 1 reads:
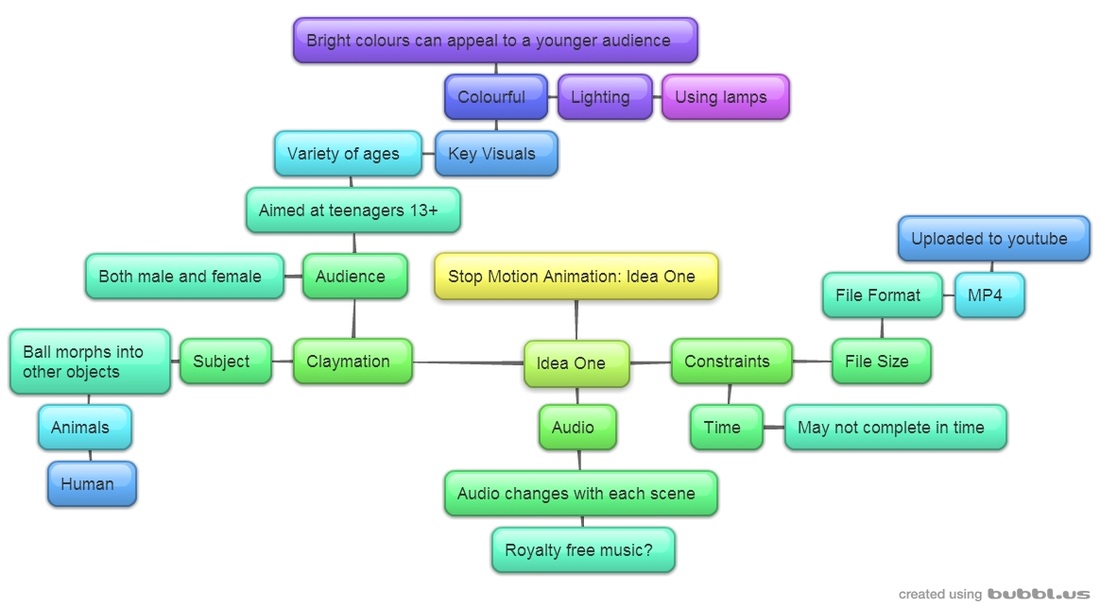
Stop Motion Animation: Idea One.
Sound: Audio changes with each scene and the consideration of royalty free music.
Claymation: Backdrop. Possible one set background, more likely changing the scene with each object in order to further reflect each objects meaning.
Audience: Aimed at children but can be viewed by people of all ages, the animation is not gender specific.
Key visual themes: In order to appeal more to children bright colors will be used.
Lighting: We will consider the idea of using lamps to brighten our scene if the stage is too dark to film on and also keep the constancy of light.
Subject: The main idea is to have a single ball of clay morph into other simple objects such as a snake which will move along the set and other simple models before the clay will become a humanoid figure, a second ball of clay will appear on set and morph into a humanoid also. The two figures will proceed to fight one another. The two people will come together and morph into a tree which will then split into two halves and become a ball once again. End. The ending will be followed by credits.
Constraints: We may encounter such difficulties like time management which can hinder our modelling. To avoid this we will be sure to put in extra time in order for this to work. File size is also an issue, we will make sure to keep the file small so it uploads in time and also is a one to two minute feature as he brief specifies. We have to make sure to upload to YouTube via an MP4 video file format.
Claymation is basically clay being animated using stop frame. The process involves using objects or characters created from clay or other mouldable material, and then taking images of each scene that will be replayed in rapid succession to create the illusion of movement. Some well know films are made with this technique such as Wallace and Gromit.
In order to use Claymation in a professional manner the models are often given wire underneath the clay to stop them falling apart. To have the illusion of the characters moving each limb is moved slightly between each frame.
Clay animation is very time consuming therefore productions are usually quite short in length than other animated material due to the work load involved. When Gumby and Pokey came around the form of animation gained great public interest as entertainment. Clay animation was also one of the first forms of 3D animation.
The image below is a rabbit which has been made entirely from clay/Plasticine; this was most likely made using a variety of molding tools and someone who has much more experience in modelling this style of animation.
Generation of concepts
In this section I have looked at possible subjects I could base my animation from and also the subject of my animation
1. Subject
Everyday objects which can be manipulated easily and without making many modifications to the original object. Also the set can be the natural surroundings as they would be there in the first place which keeps with the idea of “everyday objects”
Whiteboard stop motion consists of having access to a whiteboard and pens, a lot of drawing skill may be required when creating these animations in order to keep each drawing similar in look.
Paper cut out animation means drawing your character and simply cutting them out in order to make them stand out
LEGO animation is simply using LEGO people or objects to create your animation, these animations are often called "Brickfilms" they are similar to clay animation, i feel this would be easier than claymation since the models are easy to build however slightly harder to move with the possibility of them falling apart
Sticky notes are quite hard to execute well since they feature a lot of time consuming work, the possibility of sticky notes falling out of place or coming back later to the project and sticking them in the wrong place are major issues to consider and could potentially destroy a good animation. However they are very creative in the way the are produced and can look very pleasing to the eye.
Human animation is done with people they can be quite easy to do if done right, popular examples include things like jumping then snapping a picture, moving forward and jumping again to give the illusion of flying. another popular example are the "human skateboard" videos
I have decided to use clay animation for the final feature. it will include a table as the set with card placed over as the ground, and also card in the background with sets of printed out pages with different background to interchange them as the model changes. The clay model will feature as a ball to start with a plain background, as the model morphs into different subjects the background will change with the model e.g. a fish will change the background to water, a snake will change the background to a forest. the model will become a ball again, then joined by another separate clay ball. the two pieces of clay will join together and form a tree.
2. Characters
When considering what characters to feature in our animation we generated mind maps in order to help create better ideas. I created some concept art for our characters in order to get a better picture to how they look and move. when thinking about what characters to actually model we need to consider the ease to create such as when we use clay and make sure they aren't fragile or too big/small so they don't fall apart or hardly move. I thought about sketching characters since i wouldn't have to worry about moving their limbs and keeping them attached. However sketching requires a lot of time which i don't have to create my animation. I decided to work with clay for my final piece since it shouldn't take very long to create simple models therefore i can save a lot of time with design, rather than having to draw to character over and over again. I have included some simple concept art below to show my thought process for each idea.
3. Technical limitations
When uploading files to Youtube my animation video has to be submitted online as a MP4, however if this were to not be possible for some reason there are a variety of formats to upload to youtube in such as: WMV, AVI, MOV, 3GP, MPEG, MP4, FLV, SWF, WebM, and MKV.
Also MP4 is the ideal format to use when uploading to this site since it gives much better quality than FLV and other formats in HD lose their quality (WMV) and also 3GP resolution can be too small.
Upload time shouldn't be much of a problem since the animation will be 2-3 minutes long, however when i import my sequence of images into Premiere pro i will have to cut down each image's length to at least a second or so to create the illusion of movement, these will have to be done individually.
Mind maps
Mind map 1 reads:
Stop Motion Animation: Idea One.
Sound: Audio changes with each scene and the consideration of royalty free music.
Claymation: Backdrop. Possible one set background, more likely changing the scene with each object in order to further reflect each objects meaning.
Audience: Aimed at children but can be viewed by people of all ages, the animation is not gender specific.
Key visual themes: In order to appeal more to children bright colors will be used.
Lighting: We will consider the idea of using lamps to brighten our scene if the stage is too dark to film on and also keep the constancy of light.
Subject: The main idea is to have a single ball of clay morph into other simple objects such as a snake which will move along the set and other simple models before the clay will become a humanoid figure, a second ball of clay will appear on set and morph into a humanoid also. The two figures will proceed to fight one another. The two people will come together and morph into a tree which will then split into two halves and become a ball once again. End. The ending will be followed by credits.
Constraints: We may encounter such difficulties like time management which can hinder our modelling. To avoid this we will be sure to put in extra time in order for this to work. File size is also an issue, we will make sure to keep the file small so it uploads in time and also is a one to two minute feature as he brief specifies. We have to make sure to upload to YouTube via an MP4 video file format.
Mind map 2 reads:
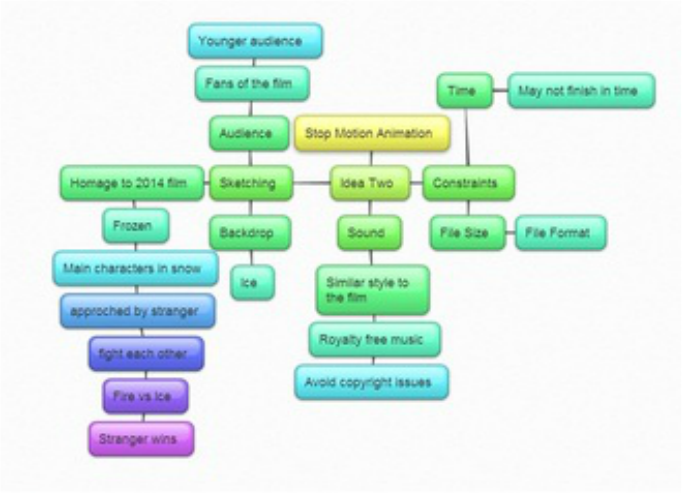
Stop motion animation
Sound: Audio is similar to the film soundtrack, in order to avoid infringing on copyrighted material it will be royalty free music with no dialouge and a range of sound effects.
Filmed with: Using a DSLR camera to take the images.
Lighting: Using a lamp to keep continuity.
Key visuals: Black and white sketched with possible colour.
Sketching: The subject is based closely to the film Frozen (2014) which includes the main character (Elsa) who is in a icey/snowy background preforming a small sequence of magic. A female stranger approches the main character and they both compete in a short fight which concludes to have a single winner which will be the stranger who approches. The new commer leaves the main character fallen on the ground and walks away. End. Ending is followed by credits.
Constraints: time management, we may not finish in time so in order to do so we will put more time in elsewhere. Also file size and the file format which will be uploaded to youtube as an MP4.
Mind map 3 reads:
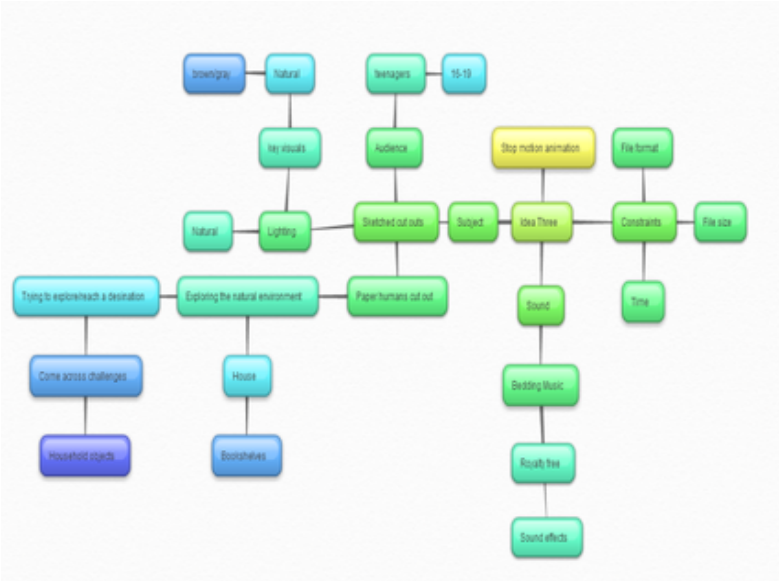
Stop Motion Animation
Sound: Royalty free bedding music along with appropriate sound effects.
Subject: Includes sketched cut outs, possibly human. (anime style). Figures exploring the environment or trying to reach a destination. The cut outs would encounter challenges in order to hinder them and create the story line.
Lighting: Natural lighting, or using a lamp to lighten dark areas.
Key visuals: Natural surroundings.
Audience: 16-18
Possible plot line: Two cut outs exploring the home environment and coming across challenges (other cut out style monsters) and ending with the cut outs returning to paper.
Production ideas
1. Story-line
Our story line follows an evolution style timeline, this is because each creature gradually shifts into something else through the animation, the story follows a clay ball which morphs into various creatures that live in different environments. e.g. fish, snake, tree.
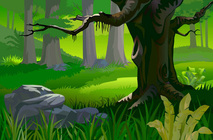
2. Set and Background
For our backgrounds we have selected images online, these are the final images we will be using. our scenes will correspond with the models on screen. Our first set will feature a forest style background. (see images below)
3. Lighting and color
For the lighting aspect of the animation we won't use any lamps for extra lights since the natural ambient light works fine.
In terms of coloration we will keep to the natural themes of the forest (greens, brown) to keep continuity and make sure it all makes sense, for example it would becoming quite confusing if we had a blue forest.
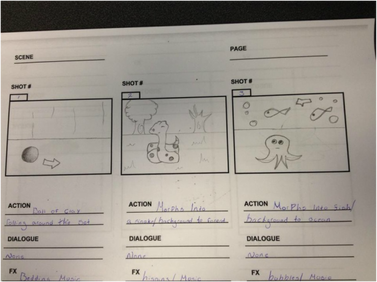
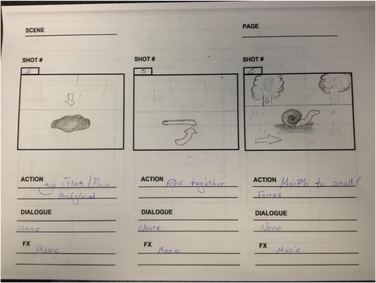
4. Storyboards
These storyboards are a very rough idea which can be changed when making our animation if any of it seems unfeasible.
We did change a lot from our original ideas, such as getting rid of most of the morphing and changing of the animals, backdrops and sounds. even so I feel this was worth while since our final idea actually derived from this.
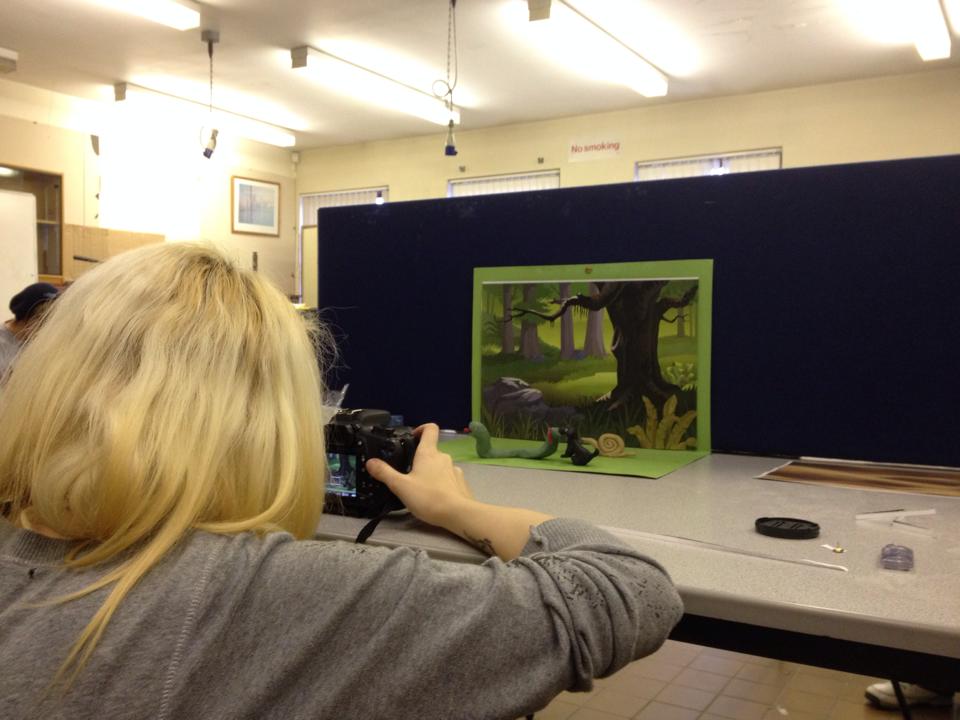
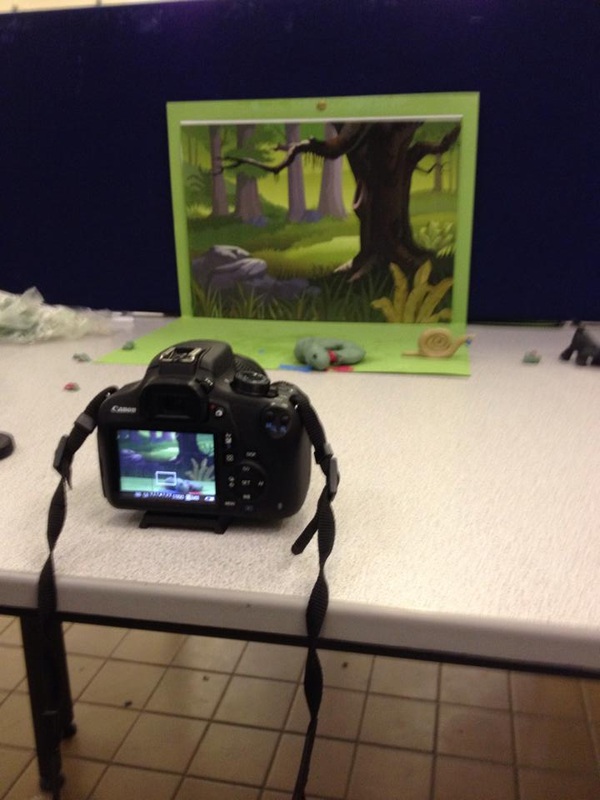
5. Set shots
We took shots of us working in the set, this is us using a DSLR camera to capture our footage, we decided to discard using a tripod and kept the camera mounted to the table using blue-tack, we did this in order to keep consistency and make sure the images were eye level. We came across the problem of the battery dying during our filming which meant we had to remove the camera from the stand, this slightly messed with our continuity and caused the frame to move slightly. Aside from this our filming went very smoothly without other issues. We used the camera in manual mode in order to create the images which feature blurred out backgrounds.
We took shots of us working in the set, this is us using a DSLR camera to capture our footage, we decided to discard using a tripod and kept the camera mounted to the table using blue-tack, we did this in order to keep consistency and make sure the images were eye level. We came across the problem of the battery dying during our filming which meant we had to remove the camera from the stand, this slightly messed with our continuity and caused the frame to move slightly. Aside from this our filming went very smoothly without other issues. We used the camera in manual mode in order to create the images which feature blurred out backgrounds.


6. Construction of elements
When we finally picked our story we had to consider what models and characters to use. After much consideration and practice modeling we chose clay models because we liked the outcome of our designs and thought they were the easiest material to work with. Unlike drawing frame by frame, using clay models require the simple movement of limbs which saves time and materials (paper). We carefully considered using different lighting techniques and deciding which worked best for our animation, we thought a lamp made things look much to bright and unnatural so we picked the regular florescent lighting provided by the room itself. We did not feel the need to use aspects like a green screen since we could easily print off a forest background, the idea of working with a green screen felt very time consuming and hard to manage so we did not use one. We used a very basic two walls (see above picture) in order to capture the animation. We considered using a bigger print out than A3 but it seemed to work quite well. In terms of our characters movement we must be sure to secure them to the set to avoid them falling over or breaking in the filming process. We considered using sticks as a makeshift skeleton to support the model. We eventually decided to make our models rather bulky and flat footed since they were made to be quite small anyway they seemed to stand up and stay put as desired. For our music we picked a piece of music from the website: http://incompetech.com/ we used music from this website as it features royalty free pieces, therefore we wont have the risk of our video being flagged or taken down.
7. Production Log
When looking at our finished animation it has changed drastically from what we first planned. We wanted to have our models evolve and grow from the clay however that seemed to be rather difficult for us to do. When actually making our animation we first build the set, we printed off an A3 sheet of paper which had our forest background on and also got an equally sized piece of green card in order to represent grass. The background was held against a wall with pins which provided better support than blue-tack which kept falling down or coming loose. After setting that up we went on to the model creation. We made sure that our models were bulky so they can support themselves. We tried taking shots while building the models to get the illusion of them forming on their own, however this turned out to be quite hard to do which is why we only had one animal (snake) form from the two balls in the start. The models were actually quite easy to make once we had an idea of what they should look like. We set up our camera using a tripod that could see just above the table for a front view of the animation. We made a few mistakes when capturing scenes such as hands getting in shots but we managed to crop those out when we imported the images into premiere pro. We didn't need to do much in premiere pro since the animation was quite smooth, we turned down the speed slightly and cropped out frames with hands in them. After adding our soundtrack we then exported the video in 1080p youtube quality and proceeded to upload.
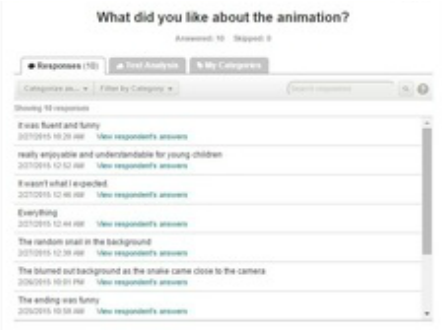
I created a survey to get feedback on my animation. https://www.surveymonkey.com/s/62ZGW86. Using this i can see my audiences opinions on what i have made and how to improve in the future.
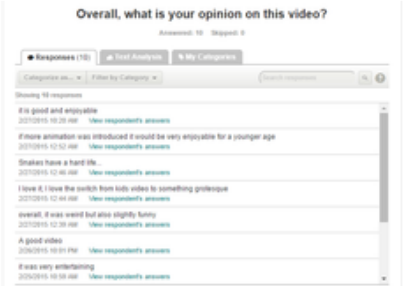
Evaluation
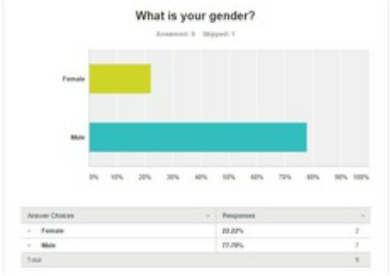
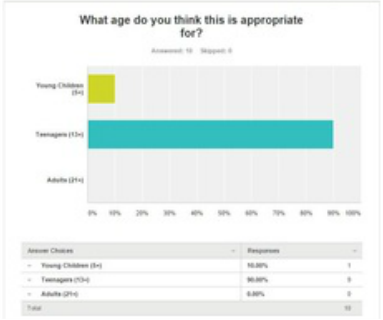
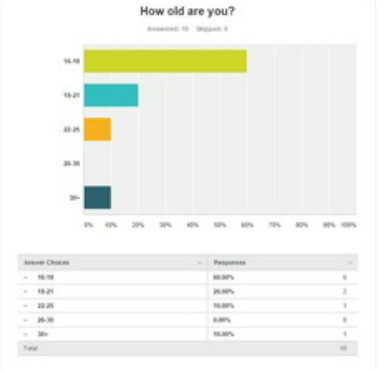
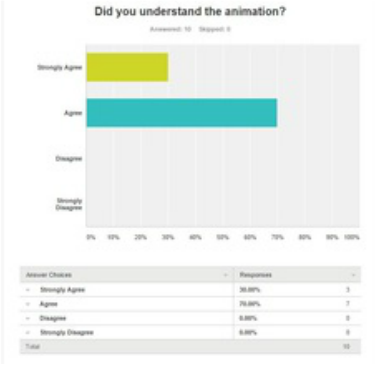
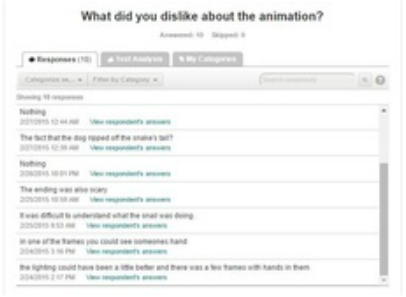
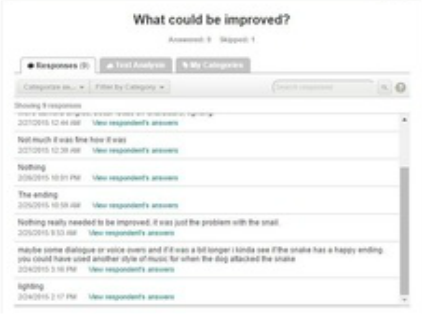
In an evaluation of my animation and based off my results of the feedback received from the survey I have gathered that in terms of my story, I can clearly see that from my results the viewers understand the most part (If not all) of my animation. The majority of the poll chose "Agree" on the question "Did you understand the animation?" Which means that in terms of a narrative it is mostly clear and understandable to an audience of the desired age. The main portion of the results came back very positive when I asked if they enjoyed the animation (question one). For the style, genre and narrative we tried to portray an obscure comedy with a darker sense of humor, I feel like we executed this well due to the soundtrack we used, the idea was to create something that clearly fit with the music used but however as the animation proceeded along the music became slightly more and more unfitting as the animation went on, creating a darker and more humorous feel. Few of the respondents commented on the "snail" model in the animation and couldn't figure out what was actually happening with the scene, when I asked "What could be improved?" for the most part I do agree that It may be slightly unclear, however in our point of view the snail was actually meant to make the viewer question the scene slightly and wonder "what's going on?" Many of our responses showed to find our animation funny, entertaining and shocking alike. We had a class viewing of the video and the obvious reaction was that the target audience found it funny to watch. The feedback we were issued also confirmed the shocked reaction to the ending of the animation.
I feel as though in terms of our modeling skills with creating the actual animals went much better than expected, with both our limited skill and lack of experience they still were easily recognizable as a snake, snail and dog. I can tell this by my audience's feedback when they actually refer to the models calling them "snake" and "snail". We got a lot of responses on our camera work and lighting. We mainly got answers which told us to improve that aspect which I also do agree on since the continuity became rather distracting, some scenes were brighter than others. This happened mainly because as we animated our models and took pictures, the shadow of the animator got caught in the scene. I feel as though this was an easy mistake to make but also could have been easily avoided with the use of more test shots and reviewing our footage as we worked. Comments were also made about our camera work and how the background blurred out when the snake approached the camera. We used this effect purposely to get the depth of field to clearly differentiate the foreground and background, according to our feedback this worked well for us and the audience could plainly see the techniques we applied. In terms of evaluation the soundtrack and effects, there wasn't actually any sound effects used, aside from the music that was all we used. We felt that sound effects would have actually detracted from the overall feel of the stop motion and maybe gone too overboard. We kept it as a plain soundtrack purposely for this reason. We did get comments about having more sound effects or a change in music when the dog attacked the snake, but the music was kept the same for a singular reason but however we could have added sound effects like hissing or barking, perhaps to further indulge and audience and surround them in the feel of whats happening, to further improve this animation I would add those effects.
These are the questions I asked, along with the responses.
When we finally picked our story we had to consider what models and characters to use. After much consideration and practice modeling we chose clay models because we liked the outcome of our designs and thought they were the easiest material to work with. Unlike drawing frame by frame, using clay models require the simple movement of limbs which saves time and materials (paper). We carefully considered using different lighting techniques and deciding which worked best for our animation, we thought a lamp made things look much to bright and unnatural so we picked the regular florescent lighting provided by the room itself. We did not feel the need to use aspects like a green screen since we could easily print off a forest background, the idea of working with a green screen felt very time consuming and hard to manage so we did not use one. We used a very basic two walls (see above picture) in order to capture the animation. We considered using a bigger print out than A3 but it seemed to work quite well. In terms of our characters movement we must be sure to secure them to the set to avoid them falling over or breaking in the filming process. We considered using sticks as a makeshift skeleton to support the model. We eventually decided to make our models rather bulky and flat footed since they were made to be quite small anyway they seemed to stand up and stay put as desired. For our music we picked a piece of music from the website: http://incompetech.com/ we used music from this website as it features royalty free pieces, therefore we wont have the risk of our video being flagged or taken down.
7. Production Log
When looking at our finished animation it has changed drastically from what we first planned. We wanted to have our models evolve and grow from the clay however that seemed to be rather difficult for us to do. When actually making our animation we first build the set, we printed off an A3 sheet of paper which had our forest background on and also got an equally sized piece of green card in order to represent grass. The background was held against a wall with pins which provided better support than blue-tack which kept falling down or coming loose. After setting that up we went on to the model creation. We made sure that our models were bulky so they can support themselves. We tried taking shots while building the models to get the illusion of them forming on their own, however this turned out to be quite hard to do which is why we only had one animal (snake) form from the two balls in the start. The models were actually quite easy to make once we had an idea of what they should look like. We set up our camera using a tripod that could see just above the table for a front view of the animation. We made a few mistakes when capturing scenes such as hands getting in shots but we managed to crop those out when we imported the images into premiere pro. We didn't need to do much in premiere pro since the animation was quite smooth, we turned down the speed slightly and cropped out frames with hands in them. After adding our soundtrack we then exported the video in 1080p youtube quality and proceeded to upload.
I created a survey to get feedback on my animation. https://www.surveymonkey.com/s/62ZGW86. Using this i can see my audiences opinions on what i have made and how to improve in the future.
Evaluation
In an evaluation of my animation and based off my results of the feedback received from the survey I have gathered that in terms of my story, I can clearly see that from my results the viewers understand the most part (If not all) of my animation. The majority of the poll chose "Agree" on the question "Did you understand the animation?" Which means that in terms of a narrative it is mostly clear and understandable to an audience of the desired age. The main portion of the results came back very positive when I asked if they enjoyed the animation (question one). For the style, genre and narrative we tried to portray an obscure comedy with a darker sense of humor, I feel like we executed this well due to the soundtrack we used, the idea was to create something that clearly fit with the music used but however as the animation proceeded along the music became slightly more and more unfitting as the animation went on, creating a darker and more humorous feel. Few of the respondents commented on the "snail" model in the animation and couldn't figure out what was actually happening with the scene, when I asked "What could be improved?" for the most part I do agree that It may be slightly unclear, however in our point of view the snail was actually meant to make the viewer question the scene slightly and wonder "what's going on?" Many of our responses showed to find our animation funny, entertaining and shocking alike. We had a class viewing of the video and the obvious reaction was that the target audience found it funny to watch. The feedback we were issued also confirmed the shocked reaction to the ending of the animation.
I feel as though in terms of our modeling skills with creating the actual animals went much better than expected, with both our limited skill and lack of experience they still were easily recognizable as a snake, snail and dog. I can tell this by my audience's feedback when they actually refer to the models calling them "snake" and "snail". We got a lot of responses on our camera work and lighting. We mainly got answers which told us to improve that aspect which I also do agree on since the continuity became rather distracting, some scenes were brighter than others. This happened mainly because as we animated our models and took pictures, the shadow of the animator got caught in the scene. I feel as though this was an easy mistake to make but also could have been easily avoided with the use of more test shots and reviewing our footage as we worked. Comments were also made about our camera work and how the background blurred out when the snake approached the camera. We used this effect purposely to get the depth of field to clearly differentiate the foreground and background, according to our feedback this worked well for us and the audience could plainly see the techniques we applied. In terms of evaluation the soundtrack and effects, there wasn't actually any sound effects used, aside from the music that was all we used. We felt that sound effects would have actually detracted from the overall feel of the stop motion and maybe gone too overboard. We kept it as a plain soundtrack purposely for this reason. We did get comments about having more sound effects or a change in music when the dog attacked the snake, but the music was kept the same for a singular reason but however we could have added sound effects like hissing or barking, perhaps to further indulge and audience and surround them in the feel of whats happening, to further improve this animation I would add those effects.
These are the questions I asked, along with the responses.

Jamie's Page

For unit 33 I have been given the task of planning, documenting and creating a stop motion animation either alone or with a partner, I will detailing my plans and actions taken to create my animation in this website.
Planning
To begin I decided I wanted to work on an animation with a partner as I felt it would help to produce a better animation in the final video. I felt that working in a pair would help us reduce the work load by sharing tasks such as using our own skills and putting them together such as Jess's drawing skills on producing a detailed and thorough storyboard and my experience from producing a claymation animation in the previous year where I learned some valuable skills and ran into issues which will assist our production.
______________________________________________________________________________________________________________________________________________
Possible animation techniques for my video
Claymation
An animation technique I have researched that I could use for my animation is using the popular technique of Claymation.
Claymation is a simple technique of creating 3D models out of clay, depending on the amount of effort put into the modelling some can actually become really detailed and thorough, however Claymation can also be achieved well even with primitive models and there a thousands of amateur and professional video online on websites such as Youtube.
A popular animation using the claymation is Aardmans Wallace and Gromit which has received worldwide and critic acclaim.
The key to making a successful animation with Claymation is getting the frames to be smooth and really achieve the correct frames needed for fluid movement. It is also worth noting that making any form of stop motion animation can be incredibly time consuming and claymation can be one of the most consuming of all, not only do you have to create the models from clay it can be prone to accidental damage which could potentially ruin the whole animation.
Time-Lapse Photography
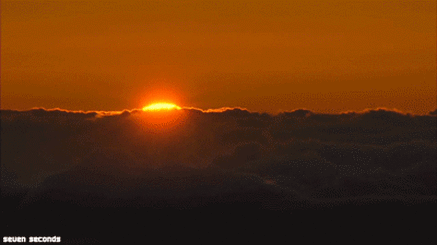
Time-Lapse Photography is a great animation technique that allows the capture of slow motion to be sped up through the lapse of time. To accomplish this a camera will typically be set up in a set location and left on a timer for a length of time (usually hours), the camera will be set to take pictures of the scene periodically to capture what is happening over time.
A good example of this would be a camera set up aiming at a horizon which will view the sun setting or rising, capturing this would normally take a lot of time but through Time-lapse photography the sequence can be captured and sped up in post-production creating fluid movement.
Planning
To begin I decided I wanted to work on an animation with a partner as I felt it would help to produce a better animation in the final video. I felt that working in a pair would help us reduce the work load by sharing tasks such as using our own skills and putting them together such as Jess's drawing skills on producing a detailed and thorough storyboard and my experience from producing a claymation animation in the previous year where I learned some valuable skills and ran into issues which will assist our production.
______________________________________________________________________________________________________________________________________________
Possible animation techniques for my video
Claymation
An animation technique I have researched that I could use for my animation is using the popular technique of Claymation.
Claymation is a simple technique of creating 3D models out of clay, depending on the amount of effort put into the modelling some can actually become really detailed and thorough, however Claymation can also be achieved well even with primitive models and there a thousands of amateur and professional video online on websites such as Youtube.
A popular animation using the claymation is Aardmans Wallace and Gromit which has received worldwide and critic acclaim.
The key to making a successful animation with Claymation is getting the frames to be smooth and really achieve the correct frames needed for fluid movement. It is also worth noting that making any form of stop motion animation can be incredibly time consuming and claymation can be one of the most consuming of all, not only do you have to create the models from clay it can be prone to accidental damage which could potentially ruin the whole animation.
Time-Lapse Photography
Time-Lapse Photography is a great animation technique that allows the capture of slow motion to be sped up through the lapse of time. To accomplish this a camera will typically be set up in a set location and left on a timer for a length of time (usually hours), the camera will be set to take pictures of the scene periodically to capture what is happening over time.
A good example of this would be a camera set up aiming at a horizon which will view the sun setting or rising, capturing this would normally take a lot of time but through Time-lapse photography the sequence can be captured and sped up in post-production creating fluid movement.
To help with my planning I created a mindmap using the website Bubbl.us.
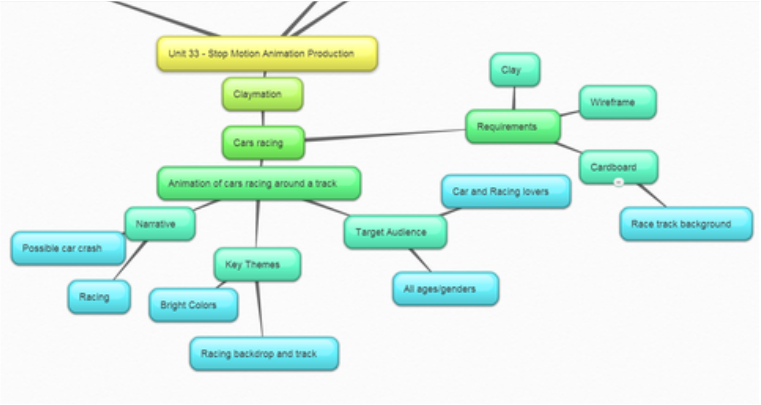
Idea 1
My first idea was to create some cars using clay and create an animation featuring the cars racing around a track. The camera would follow the cars around the card board box created racing track either from a birds eye view or eye level to create the perception of being on the track with them.
It would mainly be aimed at children with the key themes being bright and colorful.
Idea 2
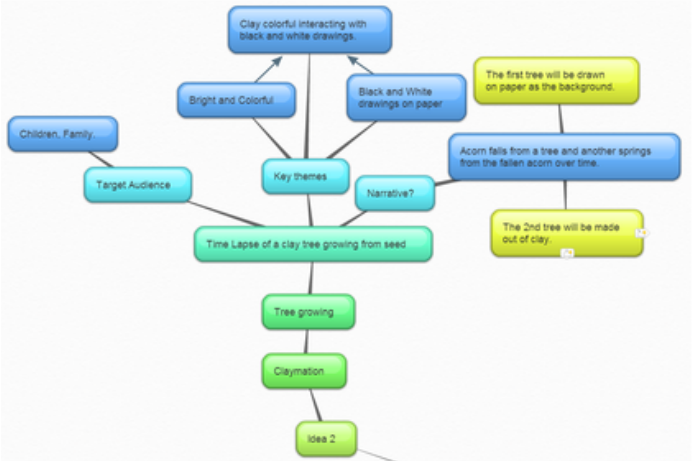
My second idea was to create a clay tree growing from the ground up, the tree would be interacting with a pencil drawn tree drawn onto the background, an acorn would be drawn falling to the ground and in its place would grow the clay tree.
I wanted to aim this animation at children specifically to give a fun example of a tree growing from an acorn, the key themes would have been bright and colorful but contrasted to the black and white drawing of the tree in the background.
Idea 3
My third and final idea is the one that we as a pair decided to put into production, the animation will feature a simple ball of clay at the beginning rolling around a basic set, it will begin to morph into different objects and begin interacting with other objects which will eventually be entering the scene.
The animation we plan to create features a ball of clay morphing into a snake, the snake will come to life and begin to roam around the forest, the snake will eventually meet other animals in the forest and begin to be attacked by a wild dog, the dog is rabid and begins to bite the snake and create a struggle between to 2 characters.
The animation will feature quite a bit of gore and violence so we aimed at target audience at a more mature age of 16+, we feel the animation takes a type of black comedic route as it starts of being an innocent animation and suddenly becomes violent and grim.
We feel this animation gives a lot more movement to be more creative and create a different variety of objects, we also felt it be more fun for our target audience to watch because we wanted to create an animation for children mainly, to create this we kept with the theme of adding bright colors and fun backgrounds, we also intend to add music and sound effects into the video according to the different object on the scene e.g. the snake will hiss as it slithers around the grass and the fish.
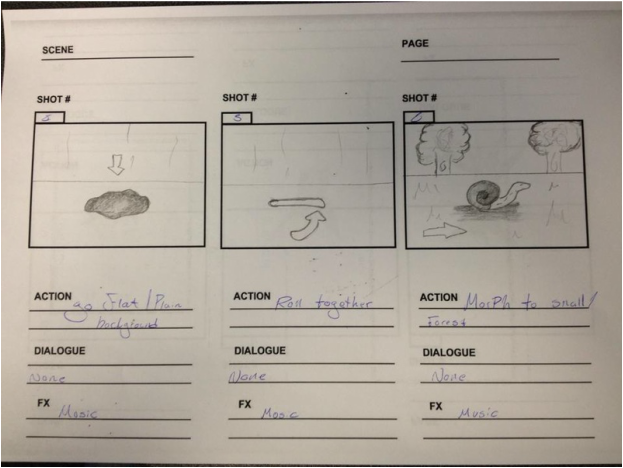
Jess created a storyboard for our animation which features a rough path we will be taking when it comes to creating the models, as we have to morph them essentially out of the same ball of clay we can only practice the models beforehand rather than others who can create those before they are ready to film their scenes.
Storyboards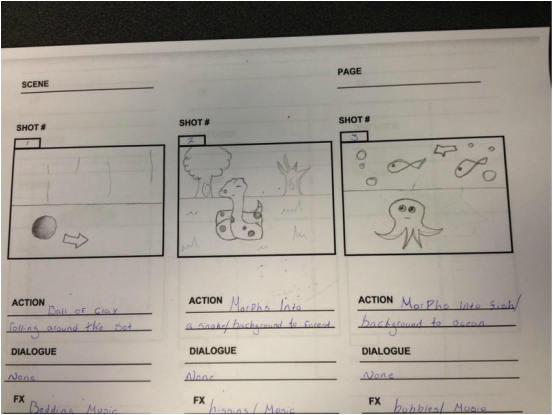
|
We deterred quite a lot from our original plan during the actual production, we feel the main reason for a change of heart was mainly a time constraint issue, our original idea would have left us needing to create a model out of the same piece of clay, for example a ball ---> snake ---> snail ---> octopus ---> fish and finally a tree growing. Not only would we have to create these models out of the same clay and on the same filming session but we also would have to change the background scenes as well. |
Overall I feel we managed to stick enough to the original storyboard to keep it relevant and also that we managed to make our animation changes in our mind a worthwhile effort.
Set Shots